Your plastic cutting board has seen countless meals prepared, from dicing vegetables to carving meats, and it shows. Those once-smooth surfaces now bear a battle-scarred landscape of deep knife marks, stains, and grooves. More than just an eyesore, these crevices can harbor bacteria, making your kitchen less hygienic and even dulling your precious knives faster. But before you banish that trusty board to the landfill, what if there was a way to bring it back to life? Resurfacing a deeply scratched plastic cutting board is a practical, eco-friendly solution that not only restores its appearance but also revitalizes its safety and functionality. This comprehensive guide will walk you through the process, transforming your worn-out board into a hygienic, smooth surface ready for many more culinary adventures.
Why Resurface Your Deeply Scratched Plastic Cutting Board?
A cutting board is one of the most frequently used tools in any kitchen, enduring daily assaults from sharp knives. Over time, these cuts accumulate, transforming a smooth, easy-to-clean surface into a network of deep grooves. These unsightly marks are more than just cosmetic imperfections; they pose significant health and performance issues. Deep scratches become ideal breeding grounds for bacteria like Salmonella and E. coli, which can hide from regular washing and cross-contaminate your food. This hidden hazard compromises food safety, a critical concern for any home cook.
Beyond hygiene, a heavily scarred plastic board can also impact your knife’s performance. The uneven surface can catch and drag knife edges, accelerating dullness and requiring more frequent sharpening. Resurfacing addresses these problems head-on. By carefully removing the top, damaged layer, you not only eliminate bacterial havens but also create a fresh, smooth cutting surface that is safer, more hygienic, and extends the life of both your board and your knives. It’s a sustainable choice that saves money and keeps your kitchen tools in prime condition.
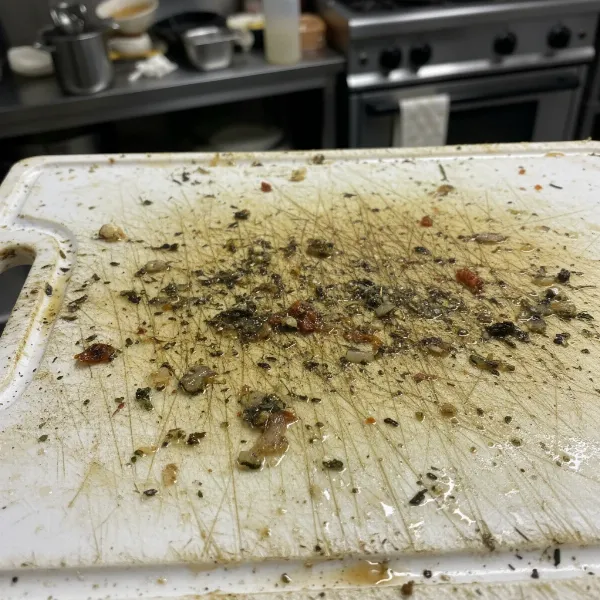 Close-up of a deeply scratched plastic cutting board with knife marks and discoloration, highlighting hygiene issues.
Assessing the Damage: When to Resurface vs. Replace
Deciding whether to resurface your plastic cutting board or replace it entirely hinges on the extent of the damage and the board’s overall integrity. While many boards can be successfully revived, some are simply beyond repair.
Start by thoroughly cleaning your board and inspecting it under good light. Run your fingers across the surface. Are the scratches relatively shallow, or do they form deep gouges that trap food particles even after washing? If the grooves are profound, discolored, and persistently dirty despite rigorous cleaning and sanitizing, resurfacing is likely a viable option. These are the boards where bacteria can thrive, and a new surface is essential for food safety.
However, there are clear indicators when replacement is the wiser choice. If your plastic board has developed cracks, especially those that run through the entire thickness, it’s compromised structurally and cannot be safely resurfaced. Similarly, if the board has become excessively thin from years of wear or previous resurfacing attempts, it may lack the material thickness required for a safe and stable cutting surface after further material removal. The U.S. Department of Agriculture (USDA) advises discarding cutting boards that are “excessively worn or develop hard-to-clean grooves.” When in doubt, prioritize safety; a new board is a small investment for peace of mind.
Tools and Materials You’ll Need for Resurfacing
Before you embark on the resurfacing journey, gathering the right tools and materials is crucial for a smooth and effective process. Having everything at hand will prevent interruptions and ensure a professional finish.
Here’s a comprehensive list of what you’ll need:
- Your Scratched Plastic Cutting Board: The star of the show!
- Safety Gear:
- Gloves: Protect your hands.
- Eye Protection: Essential to shield your eyes from plastic dust.
- Dust Mask (N95 recommended): Crucial for preventing inhalation of fine plastic particles, which can be harmful.
- Work Surface Protection:
- Dropcloth, Newspaper, or Garbage Bag: To cover your workspace and catch plastic dust.
- Clamps: At least two, to securely hold the cutting board in place during sanding.
- Sander (Optional but Recommended):
- Orbital Sander: Ideal for even, consistent sanding and faster results.
- Belt Sander or Rotary Sander: Also effective.
- Sanding Block: If you’re opting for manual sanding, a sanding block helps maintain a flat surface.
- Sandpaper (Various Grits): This is key to a smooth finish.
- Coarse Grit (e.g., 80-grit, 120-grit): For initial material removal and deep scratches.
- Medium Grit (e.g., 180-grit, 220-grit): To remove marks left by the coarse sandpaper.
- Fine Grit (e.g., 320-grit, 400-grit, or even finer for polishing): For achieving a buttery smooth finish.
- Scraper (Optional, for very deep gouges):
- Razor Blade, Utility Knife Blade, or Hand Plane: Use with extreme caution to remove significant gouges that sandpaper might struggle with initially.
- Cleaning Supplies:
- Metal Scrubber or Rough Steel Wool: For initial surface prep and cleaning during sanding.
- Dish Soap: For thorough cleaning after resurfacing.
- Clean Sponge or Cloth: For washing and wiping.
- Water: For rinsing and potentially wet sanding.
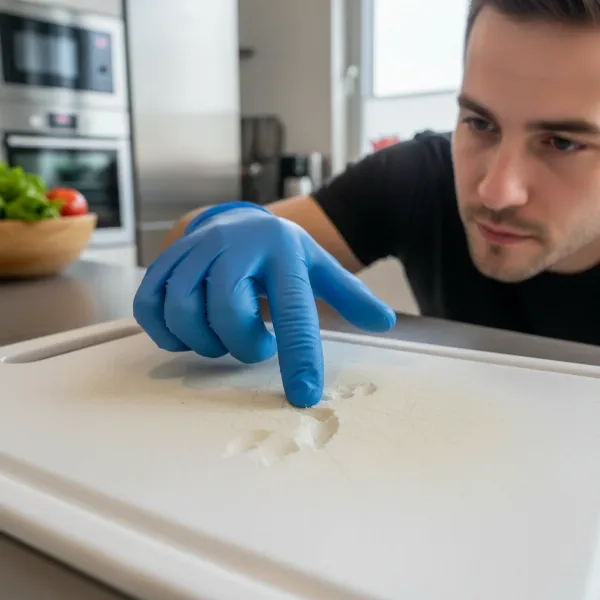 Hand inspecting a plastic cutting board to assess deep scratches and determining if it needs resurfacing or replacement.
Step-by-Step Guide to Resurfacing a Deeply Scratched Plastic Board
Resurfacing your plastic cutting board is a hands-on project that can yield incredibly satisfying results. Follow these steps carefully to ensure a safe and effective transformation.
1. Initial Cleaning and Preparation
|
Our Picks for the Best Plastic cutting board in 2026
As an Amazon Associate I earn from qualifying purchases.
|
||
| Num | Product | Action |
|---|---|---|
| 1 | THETCHRY Plastic Cutting Board Set of 3-Cutting Boards for Kitchen BPA Free, Large-Small Chopping Boards Non-Slip for Cooking Camping Dishwasher Safe, Reversible, with Grip Handle, 15"×10"×0.25" Green |

|
| 2 | Farberware Large Cutting Board, Dishwasher- Safe Plastic Chopping Board for Kitchen with Easy Grip Handle, 11-inch by 14-inch, White |
|
| 3 | KitchenAid Classic Cutting Board with Perimeter Trench and Non Slip Edges, Dishwasher Safe, 11 inch x 14 inch, White and Gray |
|
| 4 | OXO Good Grips Plastic Utility Cutting Board |
|
| 5 | FARBERWARE Extra-Large Plastic Cutting Board, 15x20 Inch Dishwasher-Safe Chopping Board with Juice Groove, Non-Slip Surface, Durable, White |
|
| 6 | GORILLA GRIP BPA-Free Reversible Kitchen Cutting Board Set of 3, US Designed, Nonporous, Juice Grooves Catch Liquid, Slip Resistant Border, Dishwasher Safe, Durable Large Food Chopping Boards, Black |
|
| 7 | Goodluck 5 Pieces Flexible Cutting Boards, BPA Free Plastic Cutting Boards for Kitchen, Non Slip Cutting Mat for Meat and Vegetables |
|
| 8 | FARBERWARE Reversible Plastic Cutting Board, 8x10 Inch, White, Dishwasher Safe, Non-Porous and Durable for Chopping, Slicing, Prep, Easy to Store |
|
| 9 | Commercial Grade Plastic Cutting Board 18 x 12 x 1/2 Thick High Density White Poly, NSF Certified and Dishwasher Safe for Food Service |
|
| 10 | Extra Large Cutting Boards, Plastic Cutting Boards for Kitchen (Set of 3) Cutting Board Set Dishwasher Chopping Board with Juice Grooves Easy-Grip Handles, Dark Grey, Empune |
|
Before any sanding begins, give your board a thorough wash with hot, soapy water to remove any food debris, grease, or surface grime. You want a clean canvas. Rinse it completely and allow it to dry. Next, prepare your workspace by laying down a dropcloth, newspaper, or a garbage bag. This will catch the plastic dust and make cleanup much easier.
2. Secure the Board
Using your clamps, securely affix the cutting board to your work surface. This stability is critical to prevent the board from shifting during sanding, which could lead to uneven results or even injury. Ensure it’s clamped snugly on at least two corners.
3. Address Deep Gouges (If Necessary)
For exceptionally deep cuts or gouges that seem beyond the reach of sandpaper, you might consider an initial scraping. Very carefully, using a razor blade, utility knife blade, or a hand plane, shave off the raised edges of these deep marks. Work slowly and with light pressure to avoid creating new imperfections. This step is optional but can significantly reduce the amount of sanding required.
4. Sanding – The Core of Resurfacing
This is where the magic happens. Always wear your dust mask and eye protection.
- Start with Coarse Grit (80 or 120-grit): Attach your coarsest sandpaper to your sander (or wrap it around your sanding block). Begin sanding the entire surface of the board. The goal here is to remove the deep scratches and level the surface. Move the sander in a consistent, overlapping pattern. Apply moderate pressure and let the sander do the work. If sanding manually, use a circular motion. You’ll see plastic dust accumulate; this is normal.
- Progress to Medium Grit (180 or 220-grit): Once the deep scratches are largely gone, switch to a medium-grit sandpaper. This step refines the surface and removes the coarser sanding marks. Continue sanding the entire board, ensuring an even finish. You should notice the surface becoming smoother.
- Finish with Fine Grit (320-grit and up): For a truly smooth, almost polished finish, move to fine-grit sandpaper. This will remove any remaining faint sanding marks and create a soft, even texture. For an extra-smooth feel, you can even go up to 400-grit or higher. Wet sanding (using waterproof sandpaper with a little water) can also help achieve a super-fine finish and reduce dust.
Throughout the sanding process, periodically wipe the surface with a metal scrubber or rough steel wool to remove accumulated plastic dust and burs. Polyethylene, the common plastic for cutting boards, can build up static, making dust removal important for efficient sanding.
5. Clean and Refine Edges
Sanding can sometimes slightly alter the edges of your board. Once you’re satisfied with the main surface, you can take a blade or fine-grit sandpaper to lightly scrape or sand the edges, ensuring they are smooth and free of any plastic burs or unevenness.
6. Final Deep Clean
This is arguably the most important step for food safety. Your board is now covered in microscopic plastic dust.
- First Rinse: Rinse the board thoroughly under running water to remove all loose dust and particles.
- Soap Scrub (Hand, Not Sponge): Apply dish soap and scrub the board with your bare hand, not a sponge initially. This helps dislodge any remaining dust without getting your sponge embedded with plastic particles. Rinse again.
- Final Soap Scrub (Sponge): Now, use a clean sponge with dish soap to wash the entire board surface one last time.
- Rinse and Dry: Rinse thoroughly with clear water and allow the board to air dry completely or pat dry with clean paper towels.
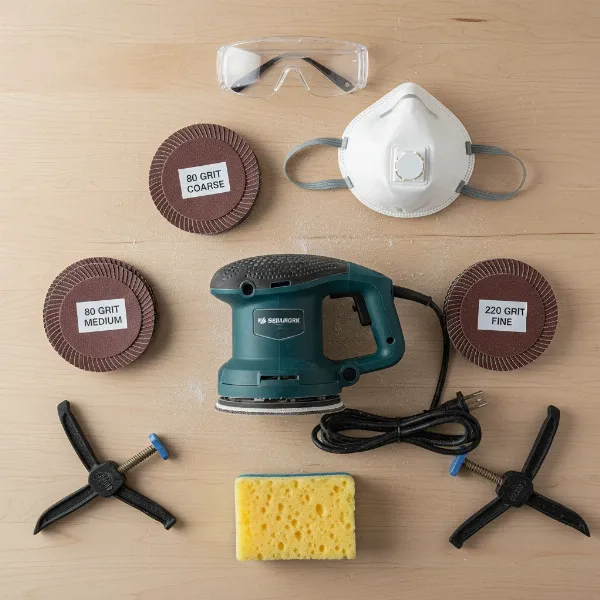 Assortment of tools and materials for resurfacing a plastic cutting board, including an orbital sander, various grit sandpapers, safety goggles, and a dust mask.
Safety Precautions During the Resurfacing Process
While resurfacing a plastic cutting board is a rewarding DIY project, it’s essential to prioritize safety throughout the process. Working with power tools and generating fine dust requires adherence to specific precautions to protect your health and prevent accidents.
The most critical concern is polyethylene dust. When plastic is sanded, it creates tiny particles that can become airborne. Inhaling this dust can be irritating to the respiratory system, and prolonged exposure should be avoided. Therefore, always wear a dust mask, preferably an N95 respirator, to filter out these fine particles.
Equally important is eye protection. Flying plastic particles can cause serious eye injuries. Always don safety goggles or a face shield before operating any sanding equipment. Additionally, wear gloves to protect your hands from abrasions and to keep them clean from plastic residue.
Beyond personal protective equipment, ensure you work in a well-ventilated area. Outdoors is ideal, but if you’re working indoors, open windows and use a fan to direct airflow away from your face. Securely clamp your cutting board to prevent it from slipping or moving unexpectedly during sanding, which could lead to loss of control over the tool or cuts. Finally, take your time, apply steady pressure, and avoid excessive force that could damage the board or cause the sander to kick back. A careful approach ensures a safe and successful resurfacing experience.
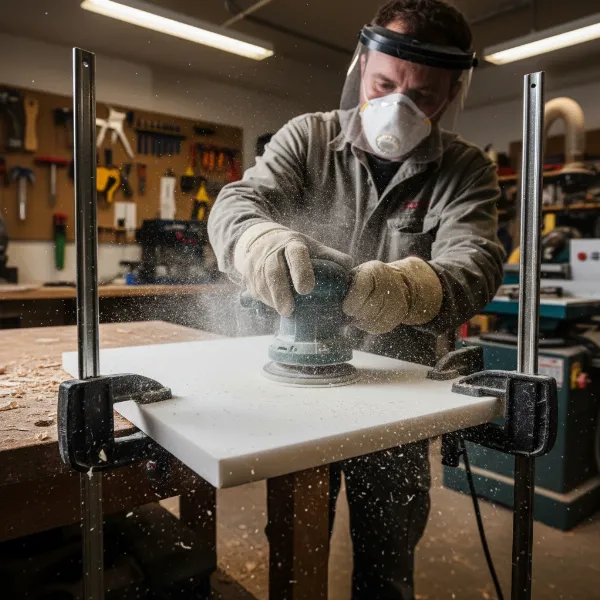 Person actively sanding a clamped plastic cutting board with an orbital sander, creating fine plastic dust, wearing safety goggles and a mask.
Maintaining Your Resurfaced Plastic Board
After all your hard work bringing your plastic cutting board back to life, proper maintenance is key to preserving its smooth surface and extending its usability. A well-maintained board will resist deep scratches and remain hygienic for longer.
The first line of defense is regular and thorough cleaning. After each use, wash your board immediately with hot, soapy water. While dishwashers are convenient for many plastic boards, handwashing ensures direct attention to all surfaces. For a deeper clean, especially after cutting raw meat, poultry, or seafood, sanitize the board. This can be done by flooding the surface with a solution of 1 tablespoon of unscented liquid chlorine bleach per gallon of water, allowing it to stand for several minutes, then rinsing thoroughly with clear water and air-drying. This helps kill any lingering bacteria that might attempt to settle into new, shallower marks.
To prevent future deep scratches, adopt better cutting habits. Use different cutting boards for different food types (e.g., one for raw meats, another for produce). Employ proper knife techniques that emphasize slicing rather than chopping with excessive force directly into the board. Store your board flat or upright in a designated area, avoiding contact with sharp objects that could cause incidental damage. By integrating these simple maintenance routines, your resurfaced plastic cutting board will stay cleaner, safer, and look its best, postponing the need for another major overhaul.
Expert Insights: Tips for the Best Results
Achieving a perfectly smooth, like-new finish on your resurfaced plastic cutting board goes beyond just following the steps; a few expert tips can elevate your results and make the process more efficient.
One crucial tip is to work slowly and methodically. Rushing through the sanding process, especially with coarse grits, can create uneven divots or excessive heat that might slightly warp the plastic. Instead, apply consistent, moderate pressure and ensure your sander or sanding block covers the entire surface evenly. Overlapping your passes by about 50% helps achieve a uniform finish.
Consider wet sanding for the final stages. While dry sanding is effective for initial material removal, using waterproof sandpaper with a bit of water can significantly reduce airborne dust and help create an exceptionally smooth, polished surface, especially with finer grits (e.g., 320-grit and above). The water acts as a lubricant and flushes away sanding debris, preventing it from clogging the sandpaper and scratching the plastic.
> “Always remember the ‘smell test’ during sanding. If your board has absorbed odors from past foods, the heat from sanding can release those aromas. This is a good indicator you’re effectively removing the old, compromised layer, but also a reminder to work in a well-ventilated space!” – Admin, Reviewfren.com, Plastic Cutting Board Expert
Finally, pay attention to the “feel” of the board. Your fingertips are excellent tools for detecting imperfections. After each grit, wipe down the board and run your hand over the surface. If you still feel any roughness or lines from the previous grit, continue sanding with the current grit until the surface feels uniform before moving to the next finer one. This meticulous attention to detail ensures a truly revitalized plastic cutting board.
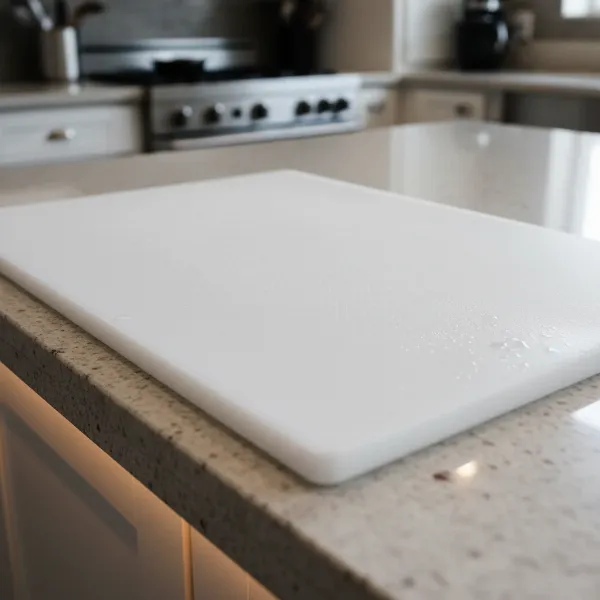 A newly resurfaced and thoroughly cleaned plastic cutting board, looking smooth and ready for use, emphasizing hygiene.
Conclusion
A deeply scratched plastic cutting board doesn’t have to be a lost cause or a breeding ground for bacteria. By understanding the proper techniques and committing to a systematic resurfacing process, you can breathe new life into your kitchen essential. From initially cleaning and clamping to progressively sanding with various grits and performing a final, thorough wash, each step contributes to restoring both the aesthetic appeal and hygienic integrity of your board. This isn’t just about making an old item look new again; it’s about reclaiming a safe and efficient surface for your culinary endeavors. Embracing this DIY approach not only saves money and reduces waste but also provides the satisfaction of transforming a worn tool into a valuable asset once more. So, are you ready to give your plastic cutting board the second chance it deserves?
Frequently Asked Questions
Can all plastic cutting boards be resurfaced?
Most solid plastic cutting boards (typically made from polyethylene) can be resurfaced. However, very thin, flexible, or severely cracked boards are usually not good candidates. The board needs sufficient thickness to withstand material removal without compromising its structural integrity.
What grit sandpaper should I start with for deep scratches?
For deeply scratched plastic cutting boards, start with a coarse grit sandpaper, typically 80-grit or 120-grit. This allows for effective material removal to get below the deepest knife marks. You’ll then progress to finer grits to smooth out the surface.
How often can I resurface my plastic cutting board?
The frequency depends on how often you use and scratch the board, and its initial thickness. Generally, a robust plastic board can be resurfaced multiple times throughout its lifespan, as long as it retains sufficient thickness and structural soundness for safe use.
Is it safe to use a resurfaced plastic cutting board for food?
Yes, a properly resurfaced and thoroughly cleaned plastic cutting board is safe for food use. The goal of resurfacing is to remove the unhygienic, bacteria-harboring grooves, creating a fresh, smooth surface that is easy to clean and sanitize.
Can I resurface a plastic cutting board by hand instead of using a power sander?
Yes, you can resurface a plastic cutting board by hand using a sanding block. However, it will require significantly more effort and time than using a power sander. Ensure you apply even pressure and work methodically to achieve a flat, consistent surface.